If you search for the best wood for a live edge table, most lists rank species by color and grain. That matters, but you will spend far more hours drying, flattening, sanding and finishing the slab than looking at it. A species that photographs well can still fight you at every step, and one that behaves can make a first build go smoothly.
These notes go species by species through the jobs a slab hands you, so you can choose a wood you are equipped to build with.
How to pick the best wood for your live edge table: match the species to your skill and shop
Three things set how hard a species will be: how hard the wood is, how its grain runs, and how much it moves as humidity changes. Hard, interlocked grain tears out under a planer or router bit. Dense wood dulls blades and loads up sandpaper faster. Wood that moves a lot is likelier to crack or cup after you finish it.
Here is how the common choices line up for a DIYer working in a home shop.
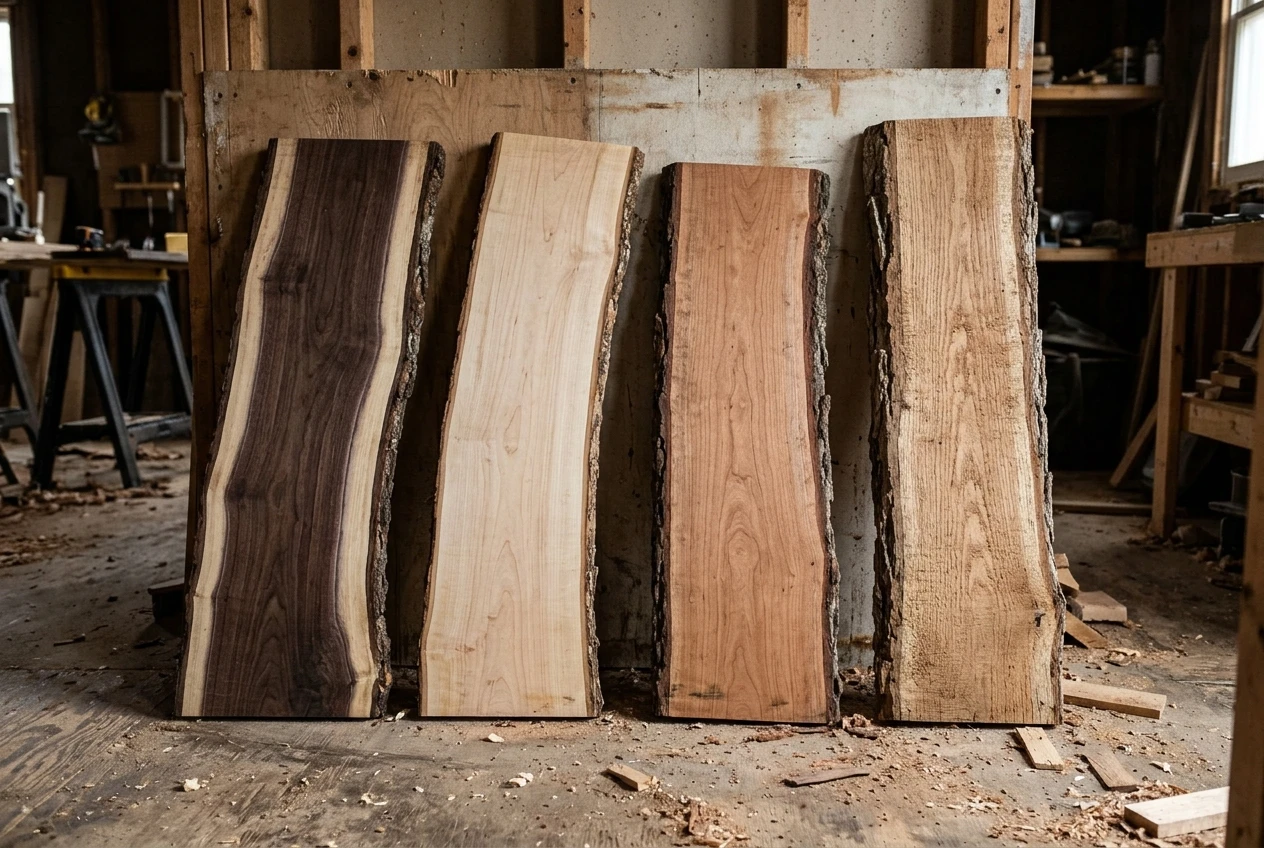
Species, Working and flattening, Sanding and finishing, Watch for; [Black walnut: Cuts and planes cleanly Takes oil well, sands evenly Cost, and pale sapwood on the edge], [Maple: Dense, tear-out in figured pieces Blotches with stain, burns if you linger Punky or spalted pockets in figured slabs], [Cherry: Cuts cleanly Darkens with light exposure Blotching with stain], [White or red oak: Heavy, tough Open pores need filling for a smooth top Black stains where water meets iron]; [Softwoods (pine, fir, cedar) Easy to flatten Resin gums up sandpaper, Dents easily; (Elm Interlocked grain, tear-out Sands slowly Twisting as it dries), (Mesquite Very hard, dulls blades Takes a high polish Heavy checking, small slabs).
For a first table, walnut is the easiest to work. It cuts without much fuss, it sands without scorching, and an oil finish brings out the color without extra steps. It costs more than most other species, so a budget build might start with a softwood or oak slab instead.
Oak is a good first choice for a dining table that will see daily use, because the surface is tough. It asks for more care in the pores and with water. Maple and cherry sit in the middle: pleasant to work, with finish quirks you can plan for.
Elm and mesquite reward patience. They are better as a second or third slab, once you have flattened and finished something easier and know how your tools behave.
How to choose the right live edge slab before you buy
The species is only one part of buying a slab. Thickness, width, flatness, how the slab was dried and where the cracks are all matter just as much, and the full checklist is in the beginner’s buying guide, so it is not repeated here.
What belongs here is the species-specific questions to ask a seller:
- Is it kiln dried or air dried, and what is the moisture reading? Species that move a lot, like elm, make this answer more important.
- Has the slab been surfaced already? A pre-flattened walnut slab is a different project from a rough-sawn oak slab.
- Where does the sapwood sit? On walnut and cherry, the pale band along the edge changes how the finished table looks.
- Is the bark tight or loose? That decides how much work the edge needs, covered in the bark section below.
How to dry live edge wood, and why it decides which slab you can trust
Wood that is still drying will keep moving after you flatten and finish it. A slab that is flat on Saturday can cup by the next season, and a finish applied over damp wood can trap moisture and cloud.
For furniture that will live indoors, the usual target is roughly 6 to 8 percent moisture content. A pin-type or pinless moisture meter is the only reliable way to check, and it is worth reading several spots: near the ends, in the middle, and at the thick areas. Ends dry fastest, so a good reading at the end tells you little about the center.
A common rule of thumb for air drying is about a year per inch of thickness, followed by time indoors to settle. Treat it as a rough guide, because climate, species and stacking all change the result. Dense species like oak, elm and mesquite are slower to release moisture, and that is partly why they crack and twist more during drying.
If you buy a slab that is only air dried, let it acclimate in the room where the table will live before you do the final flattening. Stack it flat with spacers so air reaches both faces, weight it lightly, and read the meter every week or two. When the readings stop dropping, the slab has settled.
Species affects how much you can trust a slab:
- Walnut and cherry tend to dry predictably, which makes them forgiving.
- Oak dries slowly and can check, so give it more time.
- Elm may twist while drying, so check a slab for twist before you commit.
- Softwoods dry faster, though resin pockets can weep for a while.
How to flatten a live edge slab without a giant planer
A wide slab will not fit through a benchtop planer, and it rarely comes off the mill perfectly flat. There are three practical ways to flatten it at home.
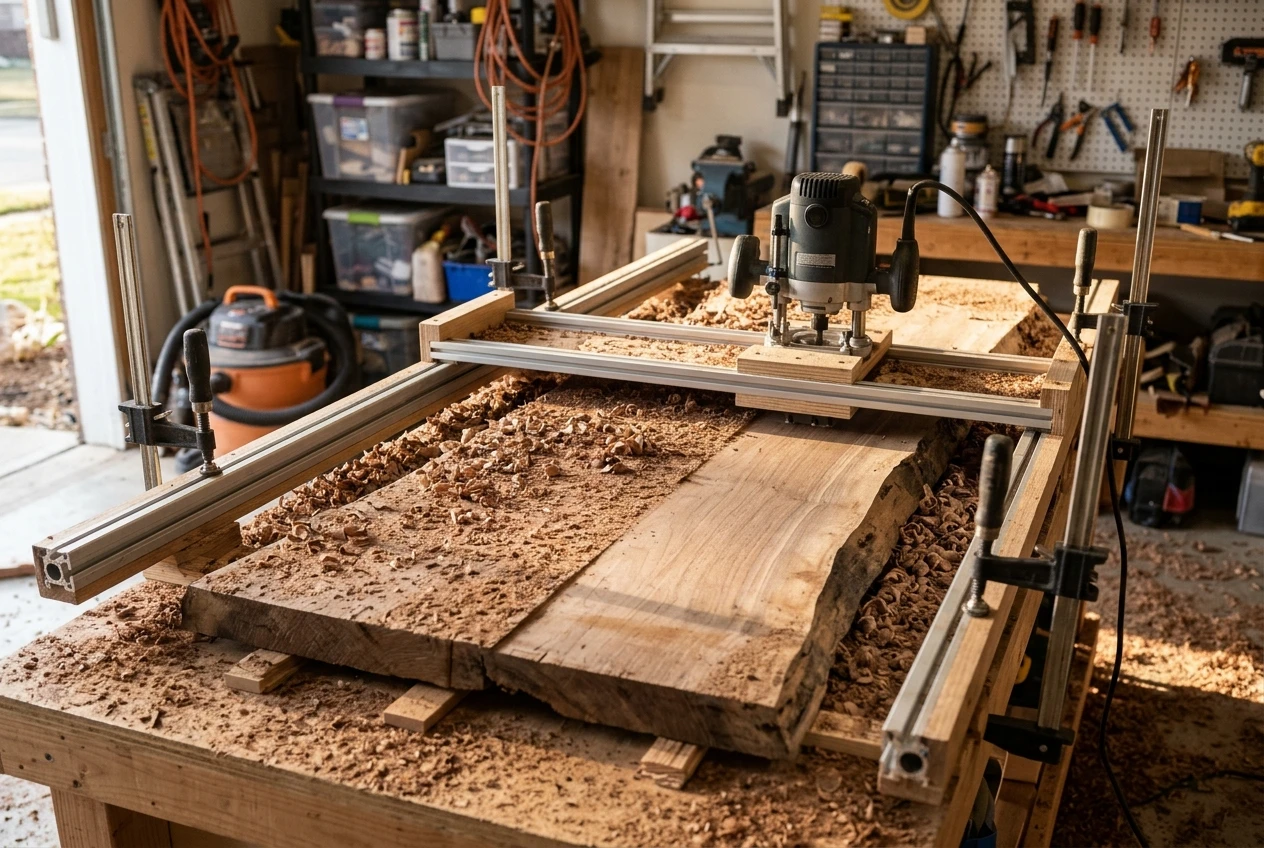
A router sled. Two straight rails run along the sides of the slab, a carriage rides on them, and a router with a surfacing bit passes back and forth over the wood. Shim the slab so it does not rock, because a rocking slab gets flattened into the wrong shape. Take light passes, especially on hard or figured wood, and remove the dust as you go.
A hand plane and a straightedge. A scrub plane or a jack plane with a cambered blade removes wood quickly on softer species. It is slower on oak, elm or mesquite, but it works with no machines at all. Winding sticks laid across each end show twist, and a straightedge shows cup and bow.
A mill or flattening service. Some lumberyards and woodworking shops run slabs through a wide-belt sander or a large planer for a fee. For a hard, twisty slab this can save a long afternoon, and if you hire it out, ask them to leave a little thickness for your final sanding.
Flatten one face first, flip the slab, flatten the other, and check the moisture again before you finish. Interlocked or figured grain, common in elm and figured maple, tears out when a bit cuts against the grain. Take shallow cuts, keep the bit sharp, and expect to sand out whatever remains.
How to sand a live edge slab, edges and all
Start with the flat faces, then move to the edges. Work through the grits in order and do not skip: 80 grit to remove milling or router marks, then 120, 150 or 180, and up to 220 if you want a very smooth surface. Stopping around 180 to 220 is usually enough for an oil finish, which needs open pores to absorb. Finer sanding can leave the surface too closed for oil to penetrate.
Wood species changes how this goes:
- Walnut sands evenly and rewards a full progression.
- Maple burns if the sander sits in one spot, so keep it moving and replace worn paper often.
- Cherry is easy to sand, but swirl marks show once it is finished, so sand with the grain at the end.
- Oak has open pores. If you want a glass-smooth top, grain filler or a few coats of finish sanded back will fill them.
- Softwoods gum up sandpaper with resin, so use open-coat paper and clean it often.
The live edge needs a gentler approach. A random orbital sander will flatten the curves and wipe out the natural shape. Use a sanding sponge or folded sandpaper, follow the contour by hand, and stop when the surface is smooth and sound. You want to remove fuzz and splinters, and leave the undulations in place.
Wear a dust mask. Some species, walnut among them, can irritate skin or airways for some people, and fine sanding dust is not something to breathe regardless of the wood.
If you plan to use a water-based finish, wipe the sanded wood with a damp cloth, let it dry, and sand lightly at your last grit. This lifts the grain once so it does not rise after the first coat.
How to remove bark from live edge wood and keep the edge looking natural
Bark is either tight or loose, and which one you have decides the work. Tap along the edge: a dull thud or a hollow sound means loose bark, which usually comes off by hand or with a putty knife. Bark that is tightly bonded can stay if you want it, but it needs sealing, because it can flake and may hold insects.
How tight the bark is depends on the species, the season the tree was cut, and how long the slab has dried, so the species name alone does not settle it. Check the slab in person when you can.
To remove it:
- Pry or scrape loose bark with a putty knife or a flat chisel, working along the edge.
- Use a stiff brush or a wire brush to clean out what is left in crevices.
- Scrape off the soft, fibrous layer just under the bark, which is called the cambium. It can look dark and feel spongy, and it will not hold a finish.
- Sand the exposed surface by hand until it feels firm and smooth.
A drill-mounted wire wheel speeds up the cleaning, but it can cut grooves, so use it lightly. Dense woods like oak and mesquite resist all of this, so allow more time.
For a natural look, keep the contour of the edge as it was. Rounded bumps, small hollows and a slightly uneven surface are what make the edge look like it grew there. If you keep the bark, thin cyanoacrylate glue can lock loose bits in place before finishing.
How to stabilize cracks, knots, and weak areas in a live-edge slab
Almost every slab has some cracks, knots or soft spots. They are not defects to hide in most cases, and many woodworkers fill them to make them a feature. Filling them keeps them from growing and makes the surface safe for plates and hands.
Start by looking at what you have:
- Surface checks are shallow splits that rarely affect strength.
- Through cracks go through the thickness and may need reinforcement underneath.
- Voids and knot holes are open spaces or loose knots that need filling.
- Punky or spalted wood is soft, discolored wood from fungal decay, which can crumble.
For most cracks and voids, epoxy is the standard fill. Clear epoxy shows the wood through it, and tinted epoxy makes a dark inlay. Block the underside of a through crack or void with tape or a board so the epoxy stays in place, and use a product rated for the depth you are pouring, because epoxy poured too thick in one pass can overheat. Follow the manufacturer’s instructions for mixing and cure times.
Bowtie keys (also called butterfly keys) can hold a crack closed and add a decorative detail. Cut a recess for each key, glue it in, and sand it flush.

For soft or punky areas, thin epoxy or a wood hardener can soak in and firm up the fibers. Test on a scrap or an inconspicuous spot first. This is common in maple and other species that spalt, so check for it before you buy.
Species affects how much of this you will do. Walnut and cherry slabs often come with only minor checking. Oak, elm and mesquite crack more as they dry, so plan on filling and consider keys on a wide slab.
How to choose the best finish for a live-edge table: oil, polyurethane, hard wax, epoxy, and food-safe options
The finish decides how the table looks, how it holds up to spills and heat, and what upkeep it needs. Each type suits different species and uses.
Penetrating oil (tung, linseed, or oil blends) soaks into the wood and brings out the grain. It gives a natural, low-sheen surface that feels like wood, and it is easy to repair and renew. It offers less protection against water and scratches than a film finish, so it suits low-traffic pieces or owners willing to reapply it. It works especially well on walnut and cherry.
Polyurethane forms a hard film on the surface. It resists water, scratches and heat better than oil, which makes it a good choice for a dining table. Oil-based polyurethane adds an amber tint that can look warm on walnut or oak and yellow on pale maple. Water-based polyurethane dries clear and keeps light woods looking light, but it can raise the grain.
Hard wax oil combines oil and wax in one product. It gives a low-sheen, natural-feeling surface with more protection than plain oil, usually in one or two thin coats. It is repairable in patches rather than needing a full refinish.
Epoxy as a surface coat creates a thick, glossy, durable layer, often called a flood coat. It is also used for river tables. It takes skill, a level workspace and dust control, and it changes the look from natural wood to glass-like. It is a poor fit for a first project unless you are confident with the materials.
Food-safe options matter if the table will hold food directly. Pure tung oil, mineral oil and many hard wax oils are labeled food safe for contact once cured. Check the label on the specific product, as claims vary, and follow the cure time before using the surface for food.
A simple match: use oil or hard wax oil on a low-traffic console, polyurethane on a dining table with kids, and test any finish on a scrap of the same species first. Oak, maple and cherry can blotch with stain, so test there before you commit.
How to finish and seal a live edge slab, step by step
Whatever finish you choose, the order of work is the same.
- Check moisture. Confirm the slab sits in the target range for indoor use.
- Fill and repair. Complete all epoxy fills and let them cure fully.
- Sand through the grits. Finish the faces and edges, then vacuum and wipe off dust with a clean cloth.
- Test the finish on scrap. Use an offcut of the same species, or the underside of the slab.
- Apply the first coat. Work in thin, even coats. Wipe off excess oil after the time on the label.
- Let it cure. Follow the recommended time between coats. Thin coats cure better than thick ones.
- Scuff between coats. For film finishes, sand lightly with fine paper (220 to 320) and wipe the dust.
- Finish all surfaces. Coat the underside and edges as well as the top. Uneven finishing is a common cause of cupping, because moisture then moves through one face faster than the other.
- Cure before use. Allow the full cure time before heavy use, which can be days or weeks for some products.
Oily rags from linseed and some other oils can heat up as they cure and may ignite. Lay them flat to dry outdoors or soak them in water in a sealed metal container.
How to attach table legs or a base to a live-edge slab
A solid wood slab expands and contracts across its width as humidity changes. If you screw it rigidly to a base, the wood will either split or pull the fasteners loose. The base has to let the top move.
Common ways to do this:

- Slotted holes in a cleat or metal bracket let the screw slide as the slab moves. Use a washer under the screw head.
- Oversized holes with washers work the same way for hairpin legs or metal plates, and the screws must not be tightened hard against the wood.
- Table-top fasteners (sometimes called buttons or figure-eight fasteners) sit in a groove or recess and allow movement.
- Breadboard-style cleats can keep a slab flat, but they need to be attached with slots, not glued across the grain.
Use screws that are short enough not to poke through the top, and pre-drill the holes. Put the fasteners where the slab is solid, away from cracks and soft spots. On a heavy slab, use enough legs or cross supports that the top does not sag, and have a helper for the lifting.
Check that the legs sit level on the floor before final assembly. Shim or adjust at the feet rather than forcing the slab to sit flat on an uneven base.
How to care for and maintain a finished live-edge table
A finished table needs routine care that depends on the finish.
- Wipe spills quickly. Water left on any wood finish can leave rings or dark spots, and it is hardest on oil.
- Use coasters and trivets. Hot dishes and cold glasses can mark even tough finishes.
- Clean with a damp cloth and mild soap, then dry. Avoid harsh cleaners or soaking the surface.
- Reapply oil or wax when the surface looks dry or water no longer beads. Oil and hard wax finishes are meant to be renewed.
- Watch humidity. Very dry indoor air in winter can open small cracks, and very humid air can swell the wood. Keep the table away from heating vents and direct sun.
- Check the fasteners once or twice a year, and confirm the slots still allow movement.
Light exposure changes color over time. Cherry darkens, and walnut can lighten slightly in strong sun. Rotate decor or use a runner if you want even color.
Small scratches in an oil or wax finish can be sanded lightly and re-oiled in place. Film finishes need more careful repair, so test on a hidden area before working on a visible one.
Ready to start your slab? Read the budget tools guide for the sanders, flattening gear and finishes worth buying first.
Leave a Reply