
Category: Live Edge

  • Live Edge Woodworking on a Budget: The Tools You Really Need

    Written by: William Neal Mann and AI

    Live edge woodworking has a certain magic to it. A raw slab carries its own personality — knots, curves, bark pockets, grain that shifts like smoke — and turning that into a finished piece doesn’t require a shop full of expensive machinery. What it does require is knowing which tools actually matter, which ones can wait, and how to stretch your dollars without sacrificing quality.

    If you’re building tables, shelves, cutting boards, or small furniture on a budget, this guide lays out the essential tools that deliver the most value for the least cost. No hype. No unnecessary gear. Just the tools that earn their keep.

    Why Live Edge Is Perfect for Budget Woodworkers

    Live edge slabs do half the design work for you. The natural shape becomes the focal point, which means you don’t need elaborate joinery or complex milling equipment to create something beautiful. With the right basic tools, you can produce professional‑grade pieces that look like they came out of a high‑end studio.

    The trick is choosing tools that pull double duty — tools that help you flatten, shape, sand, and finish without draining your wallet.

    The Essential Tools (Budget‑Friendly Shopping List)

    1. Random Orbital Sander (Your Workhorse)

    If you buy only one power tool, make it this. Live edge slabs demand patient sanding, and a good orbital sander will save you hours of frustration.

    Why it matters:

    • Removes milling marks
    • Levels small inconsistencies
    • Prepares the slab for finish

    Budget tip: A mid‑range sander with variable speed is more than enough. Pair it with quality discs — cheap sandpaper is where money really gets wasted.

    2. Angle Grinder with Wood-Shaping Discs

    This is your bark‑removal, edge‑shaping, problem‑solving tool. An angle grinder lets you sculpt the natural edge without fighting it.

    Why it matters:

    • Removes loose bark cleanly
    • Shapes uneven edges
    • Smooths knots and voids

    Budget tip: You don’t need a premium grinder. Spend your money on good shaping wheels — they make all the difference.

    3. Straightedge + Router (Flattening on a Budget)

    A full-size planer or drum sander is expensive. A router sled setup is not — and it can flatten any slab you throw at it.

    Why it matters:

    • Creates a perfectly flat surface
    • Works on slabs too wide for planers
    • Saves hundreds compared to big machines

    Budget tip: Build your own sled from plywood. The router is the only real investment.

    4. Clamps (More Important Than People Think)

    Live edge slabs often need stabilization while sanding, flattening, or filling cracks. A handful of solid clamps will make your life easier.

    Why it matters:

    • Holds slabs steady
    • Secures cauls for flattening
    • Helps with glue-ups and epoxy work

    Budget tip: You don’t need a dozen. Four to six good clamps will handle most projects.

    5. Moisture Meter

    This tiny tool prevents big mistakes. Wood that isn’t dry enough will warp, crack, or cup after you’ve already put in the work.

    Why it matters:

    • Confirms slab dryness
    • Helps you avoid unstable boards
    • Saves time, money, and frustration

    Budget tip: Even inexpensive meters are accurate enough for woodworking.

    6. Epoxy + Basic Filling Tools

    Live edge slabs come with cracks, voids, and imperfections — that’s part of their charm. Epoxy lets you stabilize and highlight those features.

    Why it matters:

    • Fills voids and cracks
    • Adds strength
    • Creates a polished, professional look

    Budget tip: Buy epoxy in smaller kits unless you’re doing river tables. A few spreaders and mixing cups are all you need.

    7. A Reliable Circular Saw

    You don’t need a table saw to break down slabs or trim ends. A circular saw with a straightedge guide will do the job cleanly.

    Why it matters:

    • Cuts slab ends square
    • Trims boards to length
    • Works for both rough and finish cuts

    Budget tip: A basic corded saw is cheaper and often more powerful than battery models.

    8. Safety Gear (Non‑Negotiable)

    Live edge work kicks up dust, bark, and debris. Protect yourself — especially when grinding or routing.

    Must‑haves:

    • Eye protection
    • Hearing protection
    • Dust mask or respirator

    Budget tip: Buy quality here. Your lungs and ears aren’t replaceable.

    Tools You Don’t Need Right Away

    A lot of beginners think they need a full shop to get started. You don’t. Here are tools you can skip until your business grows:

    • Planer
    • Jointer
    • Drum sander
    • Bandsaw
    • Expensive dust collection

    These tools are fantastic — eventually. But they’re not required to produce beautiful live edge pieces.

    Where to Save and Where to Spend

    Spend on:

    • Sanding discs
    • Epoxy
    • Router bits
    • Safety gear

    Save on:

    • Grinder
    • Clamps
    • Circular saw
    • Router sled materials

    The goal is simple: invest where quality directly affects your finished product, and save where performance doesn’t change much between budget and premium options.

    Final Thoughts

    Live edge woodworking doesn’t have to be expensive. With a handful of smart tool choices, you can build tables, shelves, cutting boards, and furniture that look like they came straight out of a custom studio. The beauty of live edge is that nature does the heavy lifting — your job is to refine it, stabilize it, and let the wood speak for itself.

    Start with the essentials, upgrade as your projects grow, and enjoy the satisfaction of creating something raw, natural, and uniquely yours.
    Leave a Reply

    Your email address will not be published. Required fields are marked *

    No comments to show.
  • Choosing Your First Live Edge Slab: A Beginner’s Buying Guide

    Choosing Your First Live Edge Slab: A Beginner’s Buying Guide

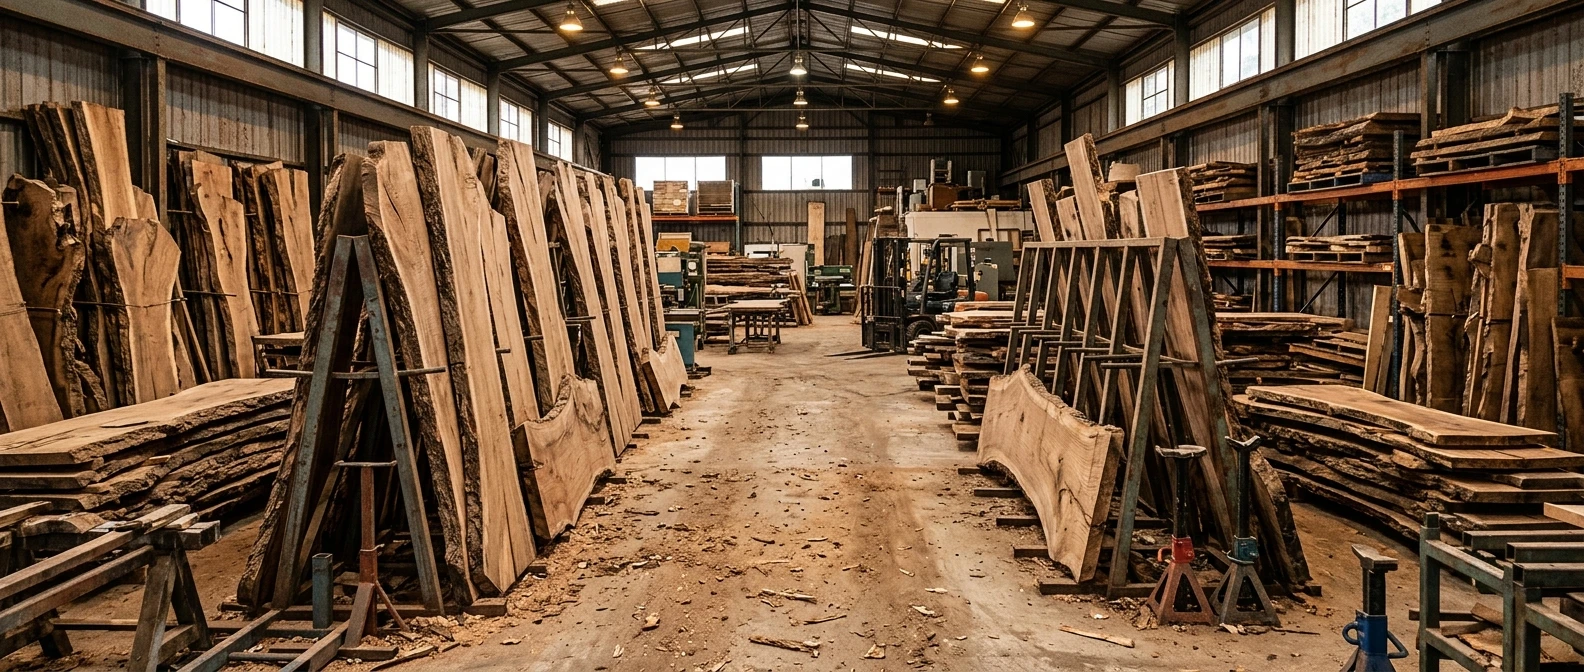
    A wide shot inside a slab yard showing rows of live edge wood slabs leaning against metal racks, their natural bark-covered edges and varied grain patterns visible under warm overhead light.

    Walking into a slab yard for the first time can feel like standing in front of a wall of puzzles. Every board looks beautiful, every piece has a story written in its grain, and the person helping you knows ten times more about wood than you do. That gap is exactly where beginners get into trouble, usually not because they picked an ugly slab, but because they picked a slab that was wet, cracked, or wrong for what they wanted to build. This guide covers what to actually check before you hand over money, so you can shop with a plan instead of a guess.

    What “live edge” actually means before you start shopping

    A live edge slab is a cut of wood that keeps the natural, uncut edge of the tree instead of trimming it into a straight rectangle. Where a standard board has four milled sides, a live edge slab has at least one side that still shows the tree’s original contour, sometimes with bark attached, sometimes with the bark removed but the shape left intact.

    This matters for shopping because live edge slabs are sold and priced differently than dimensional lumber. You’re not buying a standard size off a rack. You’re buying one specific piece of wood with its own thickness variations, its own grain pattern, and its own flaws. No two slabs are the same, which is part of the appeal and also why you need to inspect each one individually rather than trusting a general description.

    Knowing this going in changes how you shop. You’re not looking for “a 2×10 board.” You’re evaluating an individual piece the way you’d evaluate a used car: one at a time, in person if possible, with your own eyes and hands doing the checking.

    Air dried vs kiln dried: why moisture content can wreck a project

    This is the single biggest reason first slab purchases go wrong, and it has nothing to do with how the wood looks. Freshly cut wood holds a lot of water inside its cell structure. As that water leaves the wood over time, the slab shrinks and moves. If it’s still losing moisture after you’ve built it into a table, the wood will crack, cup, or twist, sometimes months after you thought the project was finished.

    Wood is generally sold in two states:

    • Air dried slabs have been left to dry naturally, usually stacked with spacers in a covered area, for a year or more depending on thickness. Air drying is slower and the wood typically settles somewhere in the 12 to 20 percent moisture range, which is still too wet for most interior furniture.
    • Kiln dried slabs have gone through a controlled drying chamber that pulls moisture out faster and more evenly, usually landing in the 6 to 9 percent range that’s appropriate for furniture used indoors.

    A slab that feels dry and looks finished can still be well above the moisture content your climate and project need. This is why checking by sight alone isn’t enough; you need a number, not an impression.

    This is also where a moisture meter earns its keep. A basic pin or pinless meter costs less than a single bad slab, and it gives you an actual reading in seconds instead of relying on the seller telling you “it’s been drying a while.” Press it to the slab, especially near the center and thicker sections, and compare the reading to what your project needs. For indoor furniture, you want to see numbers in the single digits to low teens, not far above that.

    Reading the grain: spotting cracks, checkerboarding, and punky wood

    Once you’ve got a moisture reading you’re comfortable with, the next job is reading the surface and the end grain for damage that will only get worse once you start cutting and sanding.

    Start at the ends of the slab. This is where checking (sometimes called checkerboarding when it’s severe) shows up first, because end grain loses moisture faster than the rest of the board during drying. Small surface checks running a few inches in from the end are common and often workable around. Deep checks that run far into the slab, or ones that open and close when you press on either side of the crack, are a different problem and can mean the split runs deeper than you can see.

    Run your hand across the face of the slab and look along it at an angle under good light. You’re checking for:

    • Cracks or splits anywhere other than the very ends, which can indicate internal stress or uneven drying
    • Checkerboarding, a grid pattern of small cracks that signals the wood dried too fast or unevenly
    • Punky or soft spots, areas where the wood feels spongy or crumbles slightly under thumb pressure, usually a sign of decay that will keep spreading
    • Bark inclusion lines where bark has been drawn into the wood itself, which can be a design feature or a weak point depending on how deep it runs

    None of these automatically disqualify a slab. Small end checks can be stabilized with glue or bowtie inlays, and some woodworkers actually prefer the character that minor flaws add. The point isn’t to find a flawless slab; it’s to know what you’re looking at so you’re choosing the flaws on purpose instead of discovering them after you’ve already cut and sanded the piece.

    Beginner-friendly species: walnut, maple, and other forgiving choices

    Some species are simply easier to work with as a first slab, especially if you’re still learning how wood behaves.

    Walnut is a favorite for first projects because it’s relatively stable once properly dried, works well with hand and power tools, and has a rich color that needs very little finish to look good. It’s also forgiving of small mistakes in sanding and finishing because its grain tends to hide minor surface imperfections.

    Maple is harder and denser, which makes it more durable for tabletops that will see daily use, but it can also show tool marks and sanding scratches more readily because of its lighter, tighter grain. It’s a great choice if you’re willing to take sanding seriously.

    Other species worth considering as a beginner include cherry, which darkens attractively with age and works similarly to walnut, and ash, which has a pronounced open grain that’s forgiving of small flaws and takes finish well.

    Species to approach more carefully as a first project include anything known for being highly reactive to humidity changes, or exotic species that may require specialty blades and finishes you don’t already have on hand. If a yard employee recommends a species you’ve never heard of, it’s worth asking directly how stable it is and what kind of finish it typically needs before committing.

    Matching slab thickness and size to your actual project

    Thickness and dimensions should be driven by what you’re actually building, not by what looks most impressive in the yard.

    For a dining table or desktop, slabs in the 2 to 3 inch thickness range are common, giving you enough material to flatten both faces and still end up with a substantial, stable finished thickness. For a floating shelf or smaller accent piece, 1.5 to 2 inches is often plenty, and a thinner slab will be considerably lighter and easier to handle, especially if you’re working alone.

    Before you shop, take actual measurements of the space the piece needs to fill, and add a few inches of margin on each dimension. Slabs are sold by their rough, uneven shape, so the usable width after you square up the edges or flatten the surface will almost always be smaller than the raw dimensions the yard lists. A slab that measures 36 inches at its widest point might only give you 30 usable inches once you’ve dealt with bark pockets or rough edges on the sides.

    Also think about how you’ll move and flatten the slab once you get it home. A single large slab over 3 inches thick can be genuinely heavy, sometimes well over 100 pounds for a tabletop-sized piece, and that weight affects everything from how you transport it to whether you can flatten it with a hand router sled versus needing a larger flattening setup.

    Where to buy: slab yards, online retailers, and what to ask first

    Buying in person at a slab yard is the better option for a first purchase, simply because you can run a moisture meter over the wood, inspect the grain yourself, and see the actual thickness and dimensions before committing. Most yards expect first-time buyers to ask questions, and a good one will walk you through their drying process without hesitation.

    Questions worth asking at the yard:

    • How long has this slab been drying, and was it air dried, kiln dried, or both?
    • Can I check the moisture content myself before I decide?
    • Has this slab been sitting stickered (with spacers) or stacked flat?
    • Is there a return or exchange policy if I find a problem after I get it home?

    If you’re buying online because a local yard isn’t an option, look for sellers who post the actual moisture content reading for each individual slab, not just a general statement that their wood is “kiln dried.” Ask for close-up photos of the end grain and any visible checks before you buy, and confirm their return policy in case the slab arrives with moisture or crack issues that weren’t visible in the listing photos.

    What a first slab should realistically cost

    Pricing on live edge slabs varies widely based on species, size, and thickness, but a few patterns hold true. Common domestic species like walnut, maple, and ash are generally more affordable than imported or figured woods. Smaller slabs suited to shelves or accent pieces cost less than the large, thick slabs used for dining tables, simply because there’s less material and less drying time involved.

    Expect kiln-dried wood to cost more than air-dried wood of the same species and size, since the controlled drying process takes equipment and time the seller is passing along in the price. That added cost is usually worth it for a first project, since it removes the biggest variable: whether the wood is actually ready to be built with.

    Budget for the moisture meter and any finishing supplies as part of your total project cost, not as an afterthought. Pick up an affordable moisture meter before your next slab-buying trip so you can check readings on the spot instead of trusting the seller’s word.

  • The Timeless Beauty of Live Edge Patagonian Rosewood Console Tables in Coastal Georgia

    In the Golden Isles, where salt‑softened breezes roll in from the Atlantic and sunlight dances across marsh grass, certain materials just belong. Patagonian Rosewood is one of them. This exotic hardwood — with its deep, dramatic grain and natural warmth — feels right at home in Coastal Georgia, especially when shaped into a handcrafted live‑edge console table.

    These pieces aren’t just furniture. They’re functional art, rooted in rugged craftsmanship and inspired by the coastal landscape that surrounds us.

    A Wood Species Made for Coastal Homes

    Patagonian Rosewood (also known as Curupay) is famous for its bold character:

    • Rich chocolate and burgundy tones
    • Striking grain movement
    • Natural durability and density
    • A luxurious, high‑end feel

    In coastal interiors — where whites, sands, and ocean blues dominate — the wood’s dramatic color becomes a perfect anchor. It adds warmth without overpowering the room, and its organic flow mirrors the natural curves of driftwood, dunes, and tidal creeks.

    Live edge makes that connection even stronger. Every curve, ripple, and contour in the slab feels like a story carved by nature itself.

    Why Live Edge Works So Well in the Golden Isles

    Coastal Georgia has a design language all its own: relaxed, refined, and deeply connected to nature. Live edge furniture fits seamlessly into that aesthetic because it blends rustic authenticity with modern simplicity.

    A Patagonian Rosewood console table becomes:

    • A statement piece in an entryway
    • A warm accent behind a sofa
    • A natural focal point in a hallway
    • A grounding element in a bright coastal room

    The Golden Isles lifestyle is about balance — luxury without pretense, beauty without fragility. Live edge tables embody that perfectly. They’re strong, enduring, and built to last for generations, yet they carry a softness and organic charm that feels right at home near the water.

    Handcrafted Quality That Stands Out

    When crafted by hand — flattened, reinforced, finished with care — Patagonian Rosewood transforms from a raw slab into a heirloom‑quality piece. The finishing process brings out the wood’s depth, revealing shimmering highlights and rich undertones that shift with the light.

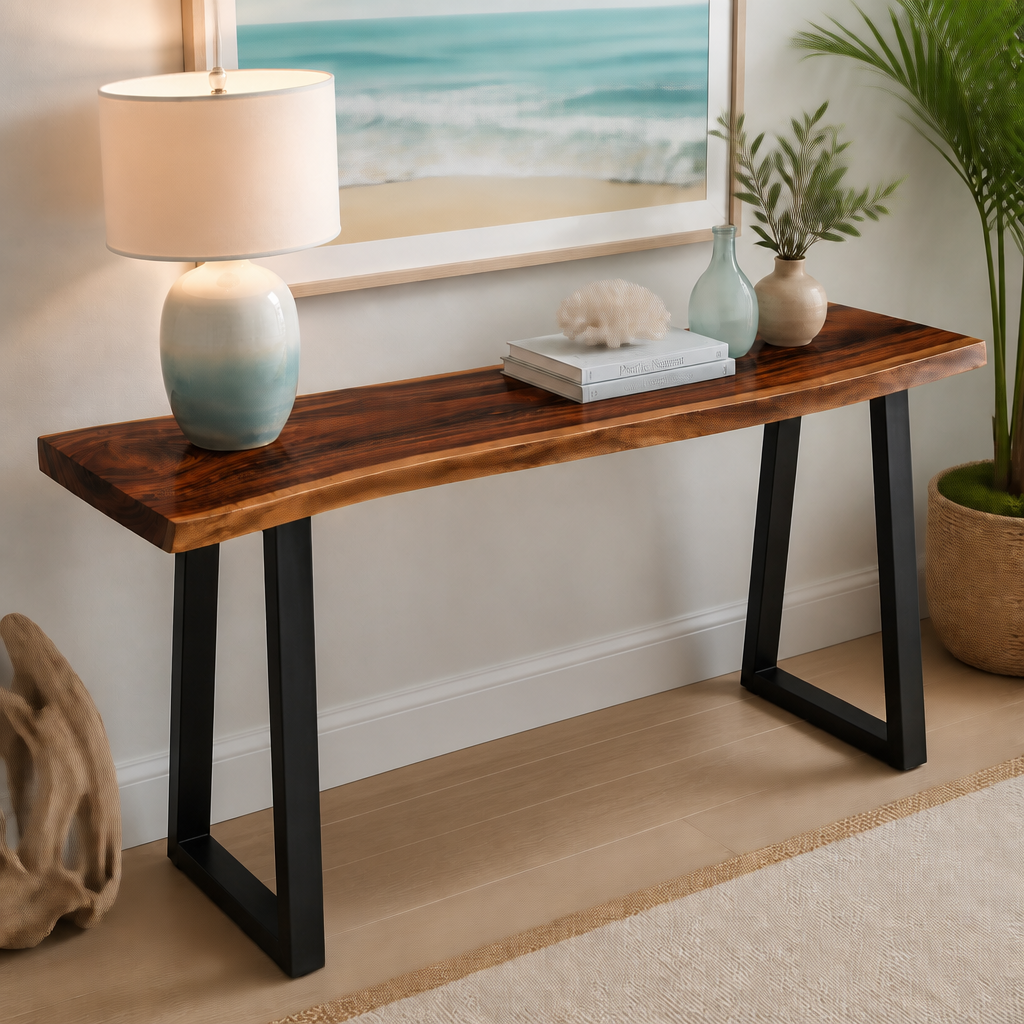
    Pairing the slab with modern steel legs creates a clean, coastal‑industrial look that resonates with homeowners across St. Simons, Brunswick, Jekyll, and Sea Island. It’s the perfect blend of rugged craftsmanship and refined design.

    A Piece of Nature, A Piece of Home

    In a region where people value authenticity, craftsmanship, and the beauty of natural materials, live edge Patagonian Rosewood console tables feel like they were made for Coastal Georgia. They bring the outdoors inside, celebrate the artistry of wood, and elevate any space with a sense of timeless elegance.

    Every piece is unique. Every grain line is a fingerprint. And every finished table becomes part of the story of the home it enters.

    Leave a Reply

    Your email address will not be published. Required fields are marked *